All lessons (and the project files):
- First steps
- Coding over-the-air
- Putting files into SPIFFS
- Untethered serial monitor
Ok, so this time whatever we are going to do, I promise we won’t be tethering our microcontroller to the laptop. Everything is going to happen over-the-air. We will upload a website with a script that will accept POST commands from our Arduino-operated server and will display the content of the serial monitor. On the controller side, we will write a simple function that instead of printing the text to serial monitor, sends it as a POST request to the client.
Here I will assume that you already have your Arduino programmed with wifi connection, OTA and file uploader (if not, please check the previous lessons).
After this lesson we will have an analogy of serial monitor that can be accessed from your browser for debugging purposes when programming on your Arduino.
Uploading serial.html
First, let’s upload the following file – serial.html – to the SPIFFS memory of NodeMCU.
- Make sure Arduino is powered on, you don’t have to connect it to the laptop, just give it an external power;
- open your browser and access
192.168.0.1/upload(or whatever the ip address you had from the previous lessons); - click
Choose file, choose theserial.htmlyou just downloaded, and clickUpload(you should be redirected tosuccess.htmland see the404: Not Foundmessage);
Now our serial.html file is uploaded to Arduino’s non-volatile memory. We’ll take a closer look to what went in the script in a second.
Saving the message to send
While the file is uploaded to the internal memory, our simple server we’re running on our NodeMCU has no idea about its existence and has no clue on how to interact with it. The idea is, that in analogy with our server.on("/upload", ...) request-response, which simply tells Arduino (server) what to do in case the client asks for 192.168.0.1/upload, we will create a server.on("/getSerialMonitor", ...) request-response so that when a client sends that kind of a request, we send it whatever information we have “stored” in our “serial monitor”. In this case, actually, it’s not the client himself, but a js script will be sending these requests 10 times a second, we’ll talk about that shortly.
Now let’s start coding. We will be saving the message to send on request (text that was meant to be output to the serial monitor) to a string, so add a variable to our ClientServer struct definition:
String serial_message; // `String` is an Arduino-specific type
Let’s also initialize that String as an empty string in our constructor:
ClientServer::ClientServer() {
  serial_message = "";
}
Now if we want to print something to the serial monitor we would usually do Serial.print(...) or Serial.println(...). Instead, now we will define two methods for our ClientServer that will be appending the given string to the serial_message, which will later be sent to the client on request. So define these two methods (and don’t forget to declare them in struct ClientServer):
void ClientServer::serialPrint(String message) {
  serial_message += message;
  if (serial_message.length() > 10000L) { // reset if message is longer than 10000 symbols
    serial_message = message;
  }
}
void ClientServer::serialPrintln(String message) { // print with a line break
  serial_message += "\n" + message;
  if (serial_message.length() > 10000L) {
    serial_message = message;
  }
}
When we now want to send something to the serial monitor, so that it’s visible from the website, we will instead of doing Serial.print(...) do myClientServer.serialPrint(String("...")). This will add the string we’ve just given to the serial_message which will be sent on client request.
Sending on request (server)
But so far the message is simply stored in Arduino’s RAM memory and is never being sent on request. So let’s handle the server side. In the ClientServer::initialize() add the following rule before the server.begin() command:
server.on("/getSerialMonitor", handleSerialMonitor); // we will define `handleSerialMonitor` shortly
handleSerialMonitor() will be a very simple function (I would even define it outside of struct) that will send the data stored in our ClientServer instance (myClientServer) as a flat text upon request (again, don’t forget to declare this function somewhere above the struct definition in analogy with handleFileUpload() etc).
void handleSerialMonitor() {
  server.send(200, "text/plane", String(myClientServer.serial_message));
}
Requesting (client)
It’s now time to take a look at the html file with the js script we uploaded to the SPIFFS memory earlier (see serial.html). Most of the html and css is actually just for the visuals, the interesting part comes inside the <script></script> tags, let’s have a closer look.
var prev_text = "";
function loadReq(call, callback) {
  var xhttp = new XMLHttpRequest();
  xhttp.onreadystatechange = function() {
    if (this.readyState == 4 && this.status == 200) {
      callback(this.responseText);
    }
  };
  xhttp.open("GET", call, true);
  xhttp.send();
}
window.setInterval(function(){
  loadReq("/getSerialMonitor", function(response) {
    if (prev_text != response) {
      console.log(response);
      text_to_put = response.replace(/\n/g, "</p><p id='serial'>> ");
      text_to_put = text_to_put.replace("</p>", "");
      text_to_put += "<span class='cursor1'>_</span></p>"
      $('.fakeScreen').html(text_to_put);
      prev_text = response;
      $('.fakeScreen').scrollTop($('.fakeScreen')[0].scrollHeight);
    }
  });
}, 100);
We have a simple js function, loadReq(), which is called (see window.setInterval(...)) once every 100 ms. This function operating now on a client side sends a /getSerialMonitor request to the server (our Arduino NodeMCU), and gets a certain response. Now since the received text might be the same as it already has printed on the screen (no new data sent from “serial monitor” in 100 ms), it first checks if that’s the case and if it’s not the case it puts the received data to the screen.
Testing
Now once we understand what’s going on, let’s try to make an actual use of it. Put the following line in your setup() (in main.cpp):
myClientServer.serialPrintln(String("Connected to ") + WiFi.localIP().toString());
Here I also want to show a minimalistic timer that doesn’t stall the program operation like delay(), but will execute a serialPrintln command every 2 seconds:
unsigned long timer = 0L;

void loop() {
  ArduinoOTA.handle();
  myClientServer.handle();
  if (millis() - timer > 2000L) {
    myClientServer.serialPrintln(String(random(100)));
    timer = millis();
  }
}
So every 2 seconds it will be writing a random number from 0 to 100 to our “serial monitor”.
Once you’re ready with everything, build and remotely upload the code. When successful, go to 192.168.0.1/serial.html in your browser (or whatever local ip your Arduino has) and look at the result.
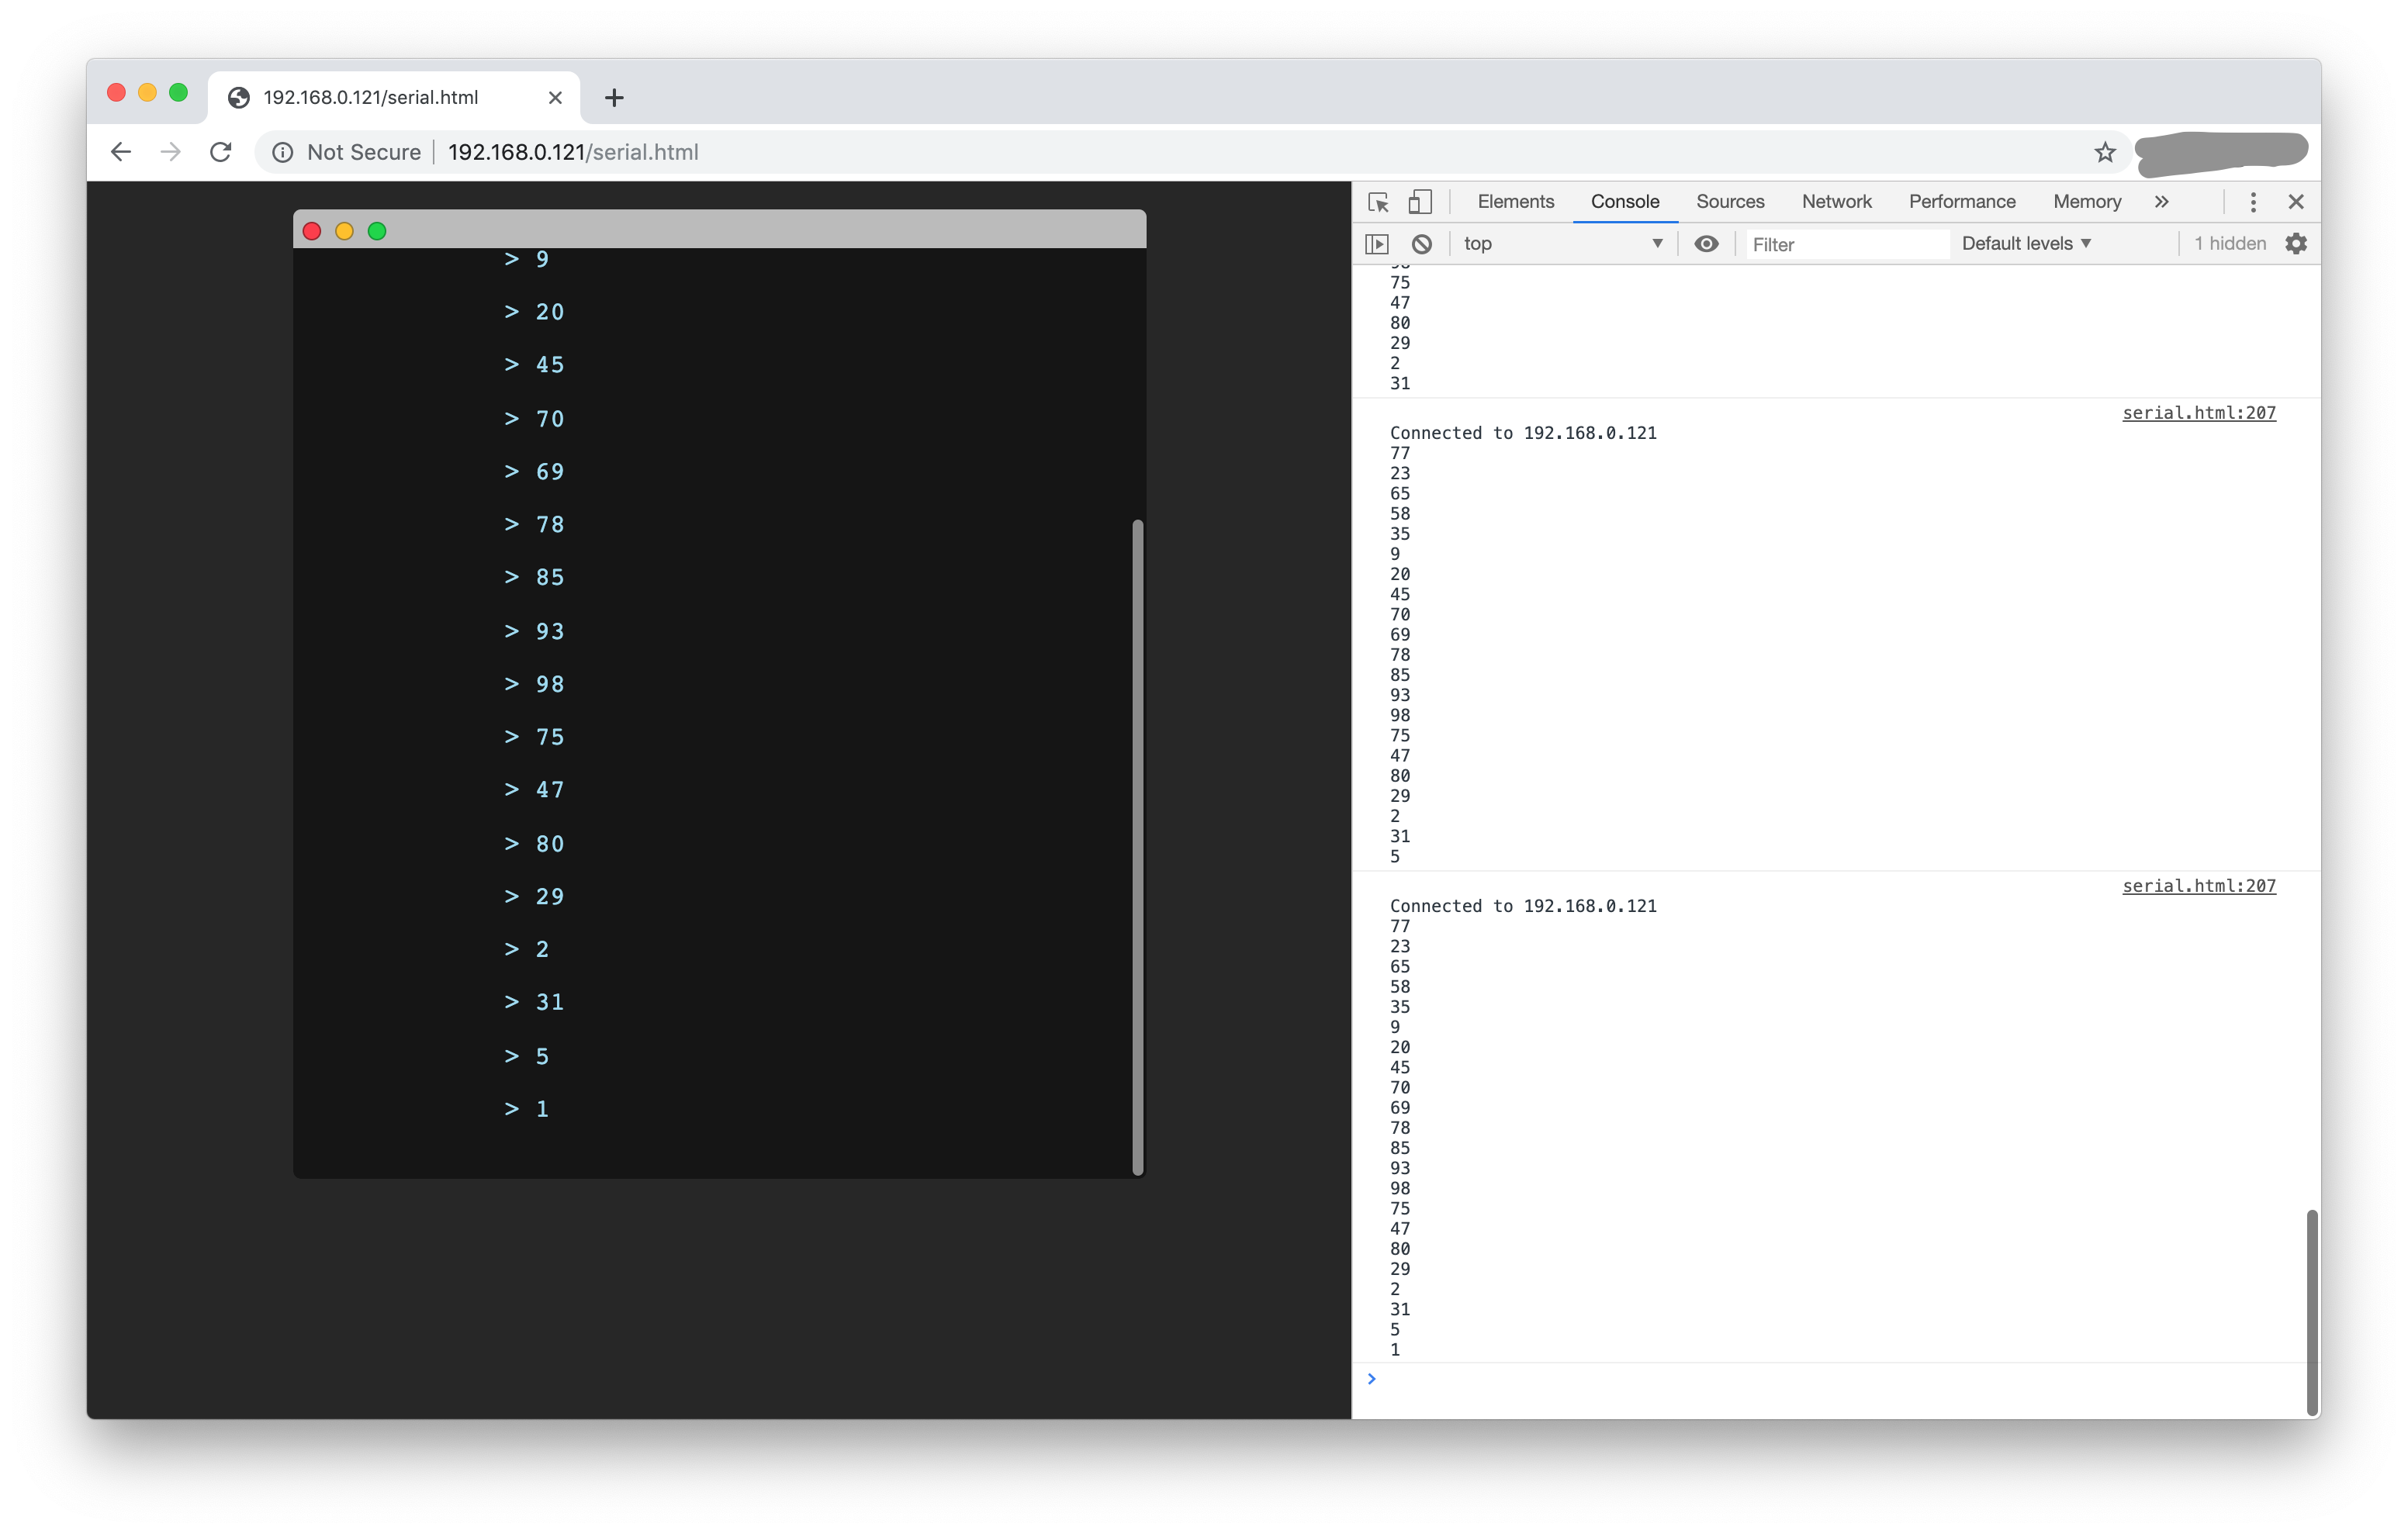
We see a mac-styled console-like window (you are free to change it in the serial.html if you wish) with the output it got from our server! Isn’t that neat? If you open the console in chrome or whatever browser you’re using you can actually see the data we receive from the server as they’re being console.log()-ed in the js script.
Takeaways
Of course there are a few things you can play around here, like the print and println do not really behave the way they should because of the way I append it in the js, but you are free to play around with that, and add whatever css/html/js you need. The point here really is, that:
- You can create a functional server (although with limited capabilities) on NodeMCU Arduino;
- once the OTA and SPIFFS file uploader is set-up, you no longer need to tether your controller to the laptop;
- during the debugging process you can use an over-the-air “serial monitor” discussed in this lesson.
And these are the just very technical tips to help make the life easier. With the help of these tools you can start developing your own server, where Arduino may accept commands from a web app that you would create (in html/js) and upload into the non-volatile memory, and program the behavior through server.on(...)-s.